
Swiftワン・ピース・コード: UIBarButtonItemにUISegmentedControlを貼り付ける

こんにちは。川上です。
色んなButtonをあっちこっちで、結構使っています。
UIBarButtonItemをNaviBarの狭いスペースに、複数のButtonを貼り付けたい場合があったので
NaviBarにUISegmentedControlを使用したがったのが、これ。
UIBarButtonItem の customView に、くっつけれるのは、結構、便利かもです。
let iconimg = UIImage(named:"info32x32.png")!.withRenderingMode(UIImageRenderingMode.alwaysOriginal)
infoButton = UIBarButtonItem(image:iconimg,
style:UIBarButtonItemStyle.plain,
target: self,
action: #selector(WaterViewController.onInfoButton(sender:)))
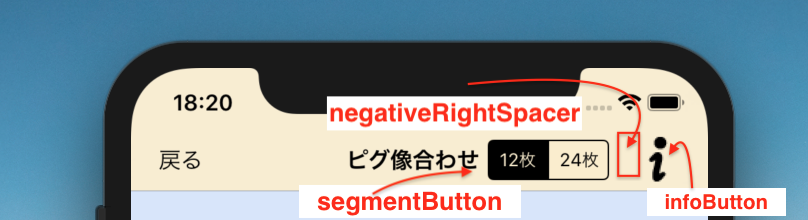
let negativeRightSpacer = UIBarButtonItem(barButtonSystemItem: UIBarButtonSystemItem.fixedSpace,
target: nil, action: nil)
// tagを設定する.
infoButton.tag = 2
// MARK: === SegmentedControlを作成する. --- toolBarView
// 表示する配列を作成する.
let myArray: NSArray = ["12枚","24枚"]
let ovbtnWH:CGFloat = 20
let ovrSegconCtl = UISegmentedControl(items: myArray as [AnyObject])
let segctl_y = toolBarView.frame.height / 2
let segctl_x = ovbtnWH * 2
ovrSegconCtl.center = CGPoint(x: segctl_x,
y:segctl_y )
ovrSegconCtl.backgroundColor = barcolor
ovrSegconCtl.tintColor = UIColor.black
ovrSegconCtl.selectedSegmentIndex = 0
// イベントを追加する.
ovrSegconCtl.addTarget(self,
action: #selector(WaterViewController.segconChanged(segcon:)),
for: UIControlEvents.valueChanged)
//customViewの設定
segmentButton = UIBarButtonItem()
segmentButton.customView = ovrSegconCtl
self.navigationItem.rightBarButtonItems = [infoButton,negativeRightSpacer, segmentButton]
ではでは。