
ラズパイでOLEDを使おう
こんばんは。國松です。
今回はラズパイでOLED(有機ELディスプレイ)を制御していきたいと思います。久しぶりにラズパイデスクトップではなくラズパイを使っていきたいと思います。
参考サイト
TomoSoft Raspverry Pi3のによるOLEDディスプレイへの表示
用意するもの
・Raspberry Pi 3 Model B+
・0.96インチ 128×64ドット有機ELディスプレイ(OLED)
・ブレッドボード
・ジャンパワイヤ(メス×メス)×4本
OLEDとは
「Organic Light Emitting Diode」の略で有機発光ダイオードの事です。
電気を流すと発光する現象をEL(ElectricLuinesceんせ)といいその発光物質に有機物をつかったものが有機ELでその現象を利用した発光素子をOLEDと言いますが日本では素子もふくめて有機ELという事が多い様です。(以上,上記リンク先のサイトより抜粋)
特徴としては自然発光素子なのでバックライトがいらないため薄型、軽量でクリアな表示(高コントラスト,高視覚野),低温から高温まで応答速度が変わらないなどがあります。
まずはOLEDに文字を表示していきたいと思います。
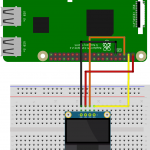
| OLED | ラズパイ |
| GND | GND |
| VCC | 3.3V |
| SCL | SCL(GPIO3) |
| SDA | SDA(GPIO2) |

接続の確認
今回使用するOLEDはi2c接続のものです。4本の線を接続するだけなの簡単です。
i2cdetect -y 1と入力してリターンキーを押して3Cと表示されていればOKです。
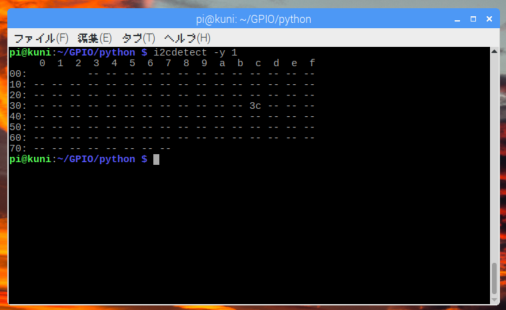
表示されていない時は接続の確認をしてみてください。
またブレッドボードにT字接続コネクタを使ってOLEDを接続している場合はi2c通信がうまくいかない事があるのでラズパイのGPIOピンに直接接続してみてください。
Adafruitのライブラリーのインストール
git clon https://github.com/adafruit/Adafruit_Python_SSD1306.git
cd Adafruit_Python_SSD1306
sudo python3 setup.py install
サンプルコードの実行
Adafruit_Python_SSD1306の中のExampelの中にあるstas.pyを実行していきます。
サンプルを実行する準備としてstas.pyの中の
disp = Adafruit_SSD1306.SSD1306_128_64(rst=RST, i2c_address=0x3C)
のコメントを外して有効にします。
Pillowのインストール
サンプルを動かすにはPillowという画像処理ライブラリーも必要です。
sudo pip install pillow
準備ができたらサンプルコードをpython3 stas.pyで実行してください。
import time

import Adafruit_GPIO.SPI as SPI
import Adafruit_SSD1306

from PIL import Image
from PIL import ImageDraw
from PIL import ImageFont

import subprocess

# Raspberry Pi pin configuration:
RST = None     # on the PiOLED this pin isnt used

# 128x32 display with hardware I2C:
#disp = Adafruit_SSD1306.SSD1306_128_32(rst=RST)

# 128x64 display with hardware I2C:
#disp = Adafruit_SSD1306.SSD1306_128_64(rst=RST)

# Note you can change the I2C address by passing an i2c_address parameter like:
disp = Adafruit_SSD1306.SSD1306_128_64(rst=RST, i2c_address=0x3C)

# Initialize library.
disp.begin()

# Clear display.
disp.clear()
disp.display()

# Create blank image for drawing.
# Make sure to create image with mode '1' for 1-bit color.
width = disp.width
height = disp.height
image = Image.new('1', (width, height))

# Get drawing object to draw on image.
draw = ImageDraw.Draw(image)

# Draw a black filled box to clear the image.
draw.rectangle((0,0,width,height), outline=0, fill=0)

# Draw some shapes.
# First define some constants to allow easy resizing of shapes.
padding = -2
top = padding
bottom = height-padding
# Move left to right keeping track of the current x position for drawing shapes.
x = 0


# Load default font.
font = ImageFont.load_default()

# Alternatively load a TTF font.  Make sure the .ttf font file is in the same directory as the python script!
# Some other nice fonts to try: http://www.dafont.com/bitmap.php
# font = ImageFont.truetype('Minecraftia.ttf', 8)

while True:

    # Draw a black filled box to clear the image.
    draw.rectangle((0,0,width,height), outline=0, fill=0)

    # Shell scripts for system monitoring from here : https://unix.stackexchange.com/questions/119126/command-to-display-memory-usage-disk-usage-and-cpu-load
    cmd = "hostname -I | cut -d\' \' -f1"
    IP = subprocess.check_output(cmd, shell = True )
    cmd = "top -bn1 | grep load | awk '{printf \"CPU Load: %.2f\", $(NF-2)}'"
    CPU = subprocess.check_output(cmd, shell = True )
    cmd = "free -m | awk 'NR==2{printf \"Mem: %s/%sMB %.2f%%\", $3,$2,$3*100/$2 }'"
    MemUsage = subprocess.check_output(cmd, shell = True )
    cmd = "df -h | awk '$NF==\"/\"{printf \"Disk: %d/%dGB %s\", $3,$2,$5}'"
    Disk = subprocess.check_output(cmd, shell = True )

    # Write two lines of text.

    draw.text((x, top),       "IP: " + str(IP),  font=font, fill=255)
    draw.text((x, top+8),     str(CPU), font=font, fill=255)
    draw.text((x, top+16),    str(MemUsage),  font=font, fill=255)
    draw.text((x, top+25),    str(Disk),  font=font, fill=255)

    # Display image.
    disp.image(image)
    disp.display()
    time.sleep(.1)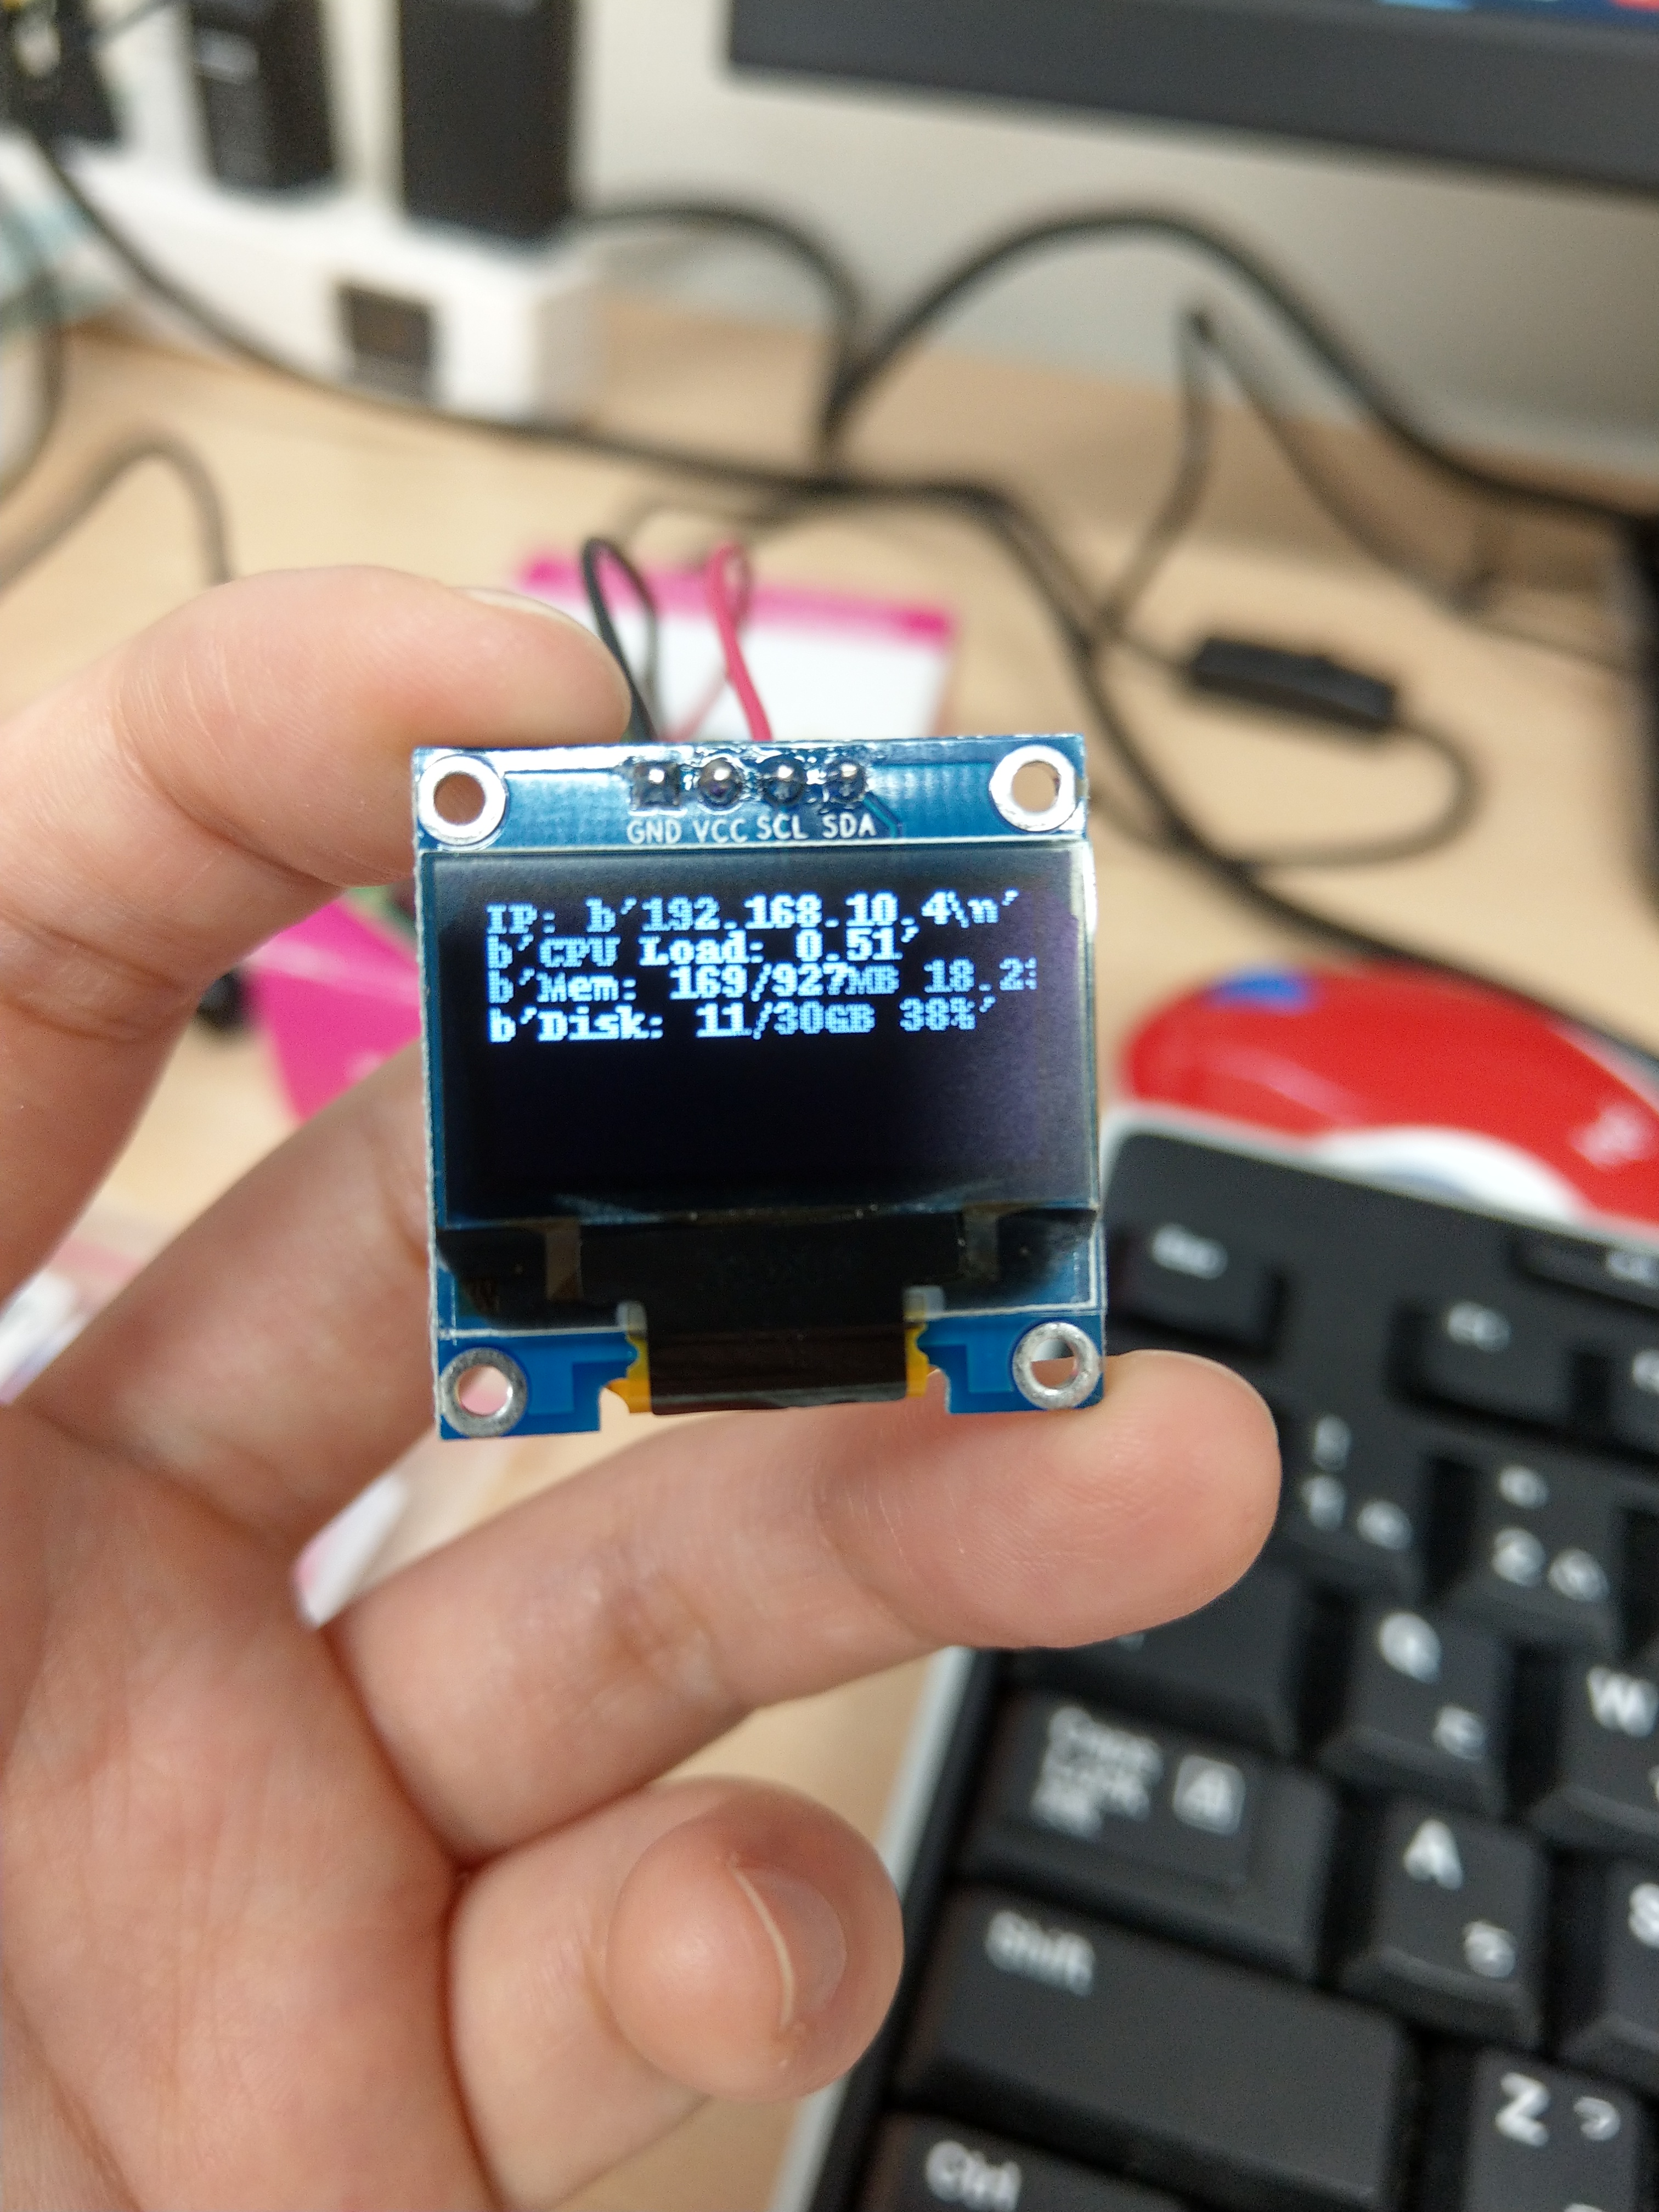
少し文字が小さいですが無事に表示されました。続いて日本語の表示をしていきたいと思います。
日本語の表示
参考サイト
LIFELOG Raspberry PiでI2C接続の128×64 OLEDに日本語を表示(美咲フォント)
美咲フォントのダウンロード
mkdir -p font/misakifont
cd font.misakifont
wget http://littlelimit.net/arc/misaki/misaki_ttf_2019-06-03.zip
unzip misaki_ttf_2019-06-03.zip
(※注意 上記サイトを参考にする場合、そのまま入力するとunzipエラーがでてしまします。美咲フォントのダウンロード先が変更になっています。)
# -*- coding: utf-8 -*-

import Adafruit_GPIO.SPI as SPI
import Adafruit_SSD1306

import Image
import ImageDraw
import ImageFont

# Raspberry Pi pin configuration
RST = 24

disp = Adafruit_SSD1306.SSD1306_128_64(rst=RST)

# Initialize library.
disp.begin()

# Clear display.
disp.clear()
disp.display()

# Create blank image for drawing.
# Make sure to create image with mode '1' for 1-bit color.
width = disp.width
height = disp.height
image = Image.new('1', (width, height))

# Get drawing object to draw on image.
draw = ImageDraw.Draw(image)

# Draw a black filled box to clear the image.
draw.rectangle((0,0,width,height), outline=0, fill=0)

# Misaki Font, awesome 8x8 pixel Japanese font, can be downloaded from the following URL.
# $ wget http://www.geocities.jp/littlimi/arc/misaki/misaki_ttf_2015-04-10.zip
font = ImageFont.truetype('/home/pi/font/misakifont/misaki_gothic.ttf', 8, encoding='unic')

# Un-comment out the following line if you want to use the default font instead of Misaki Font
# font = ImageFont.load_default()

# Write two lines of text.
x=0
y=0
for str in [ u'最近の研究から、地球上のカミナ', u'リ雲でも電子が高いエネルギーに', u'まで「加速」されている証拠が見', u'つかってきました。加速された電', u'子が大気分子と衝突することで生', u'じるガンマ線がカミナリ雲からビ', u'ーム状に放出されていることがわ', u'かったのです!  →   thdr.info' ]:
	draw.text((x,y), str, font=font, fill=255)
	y+=8

disp.image(image)
disp.display()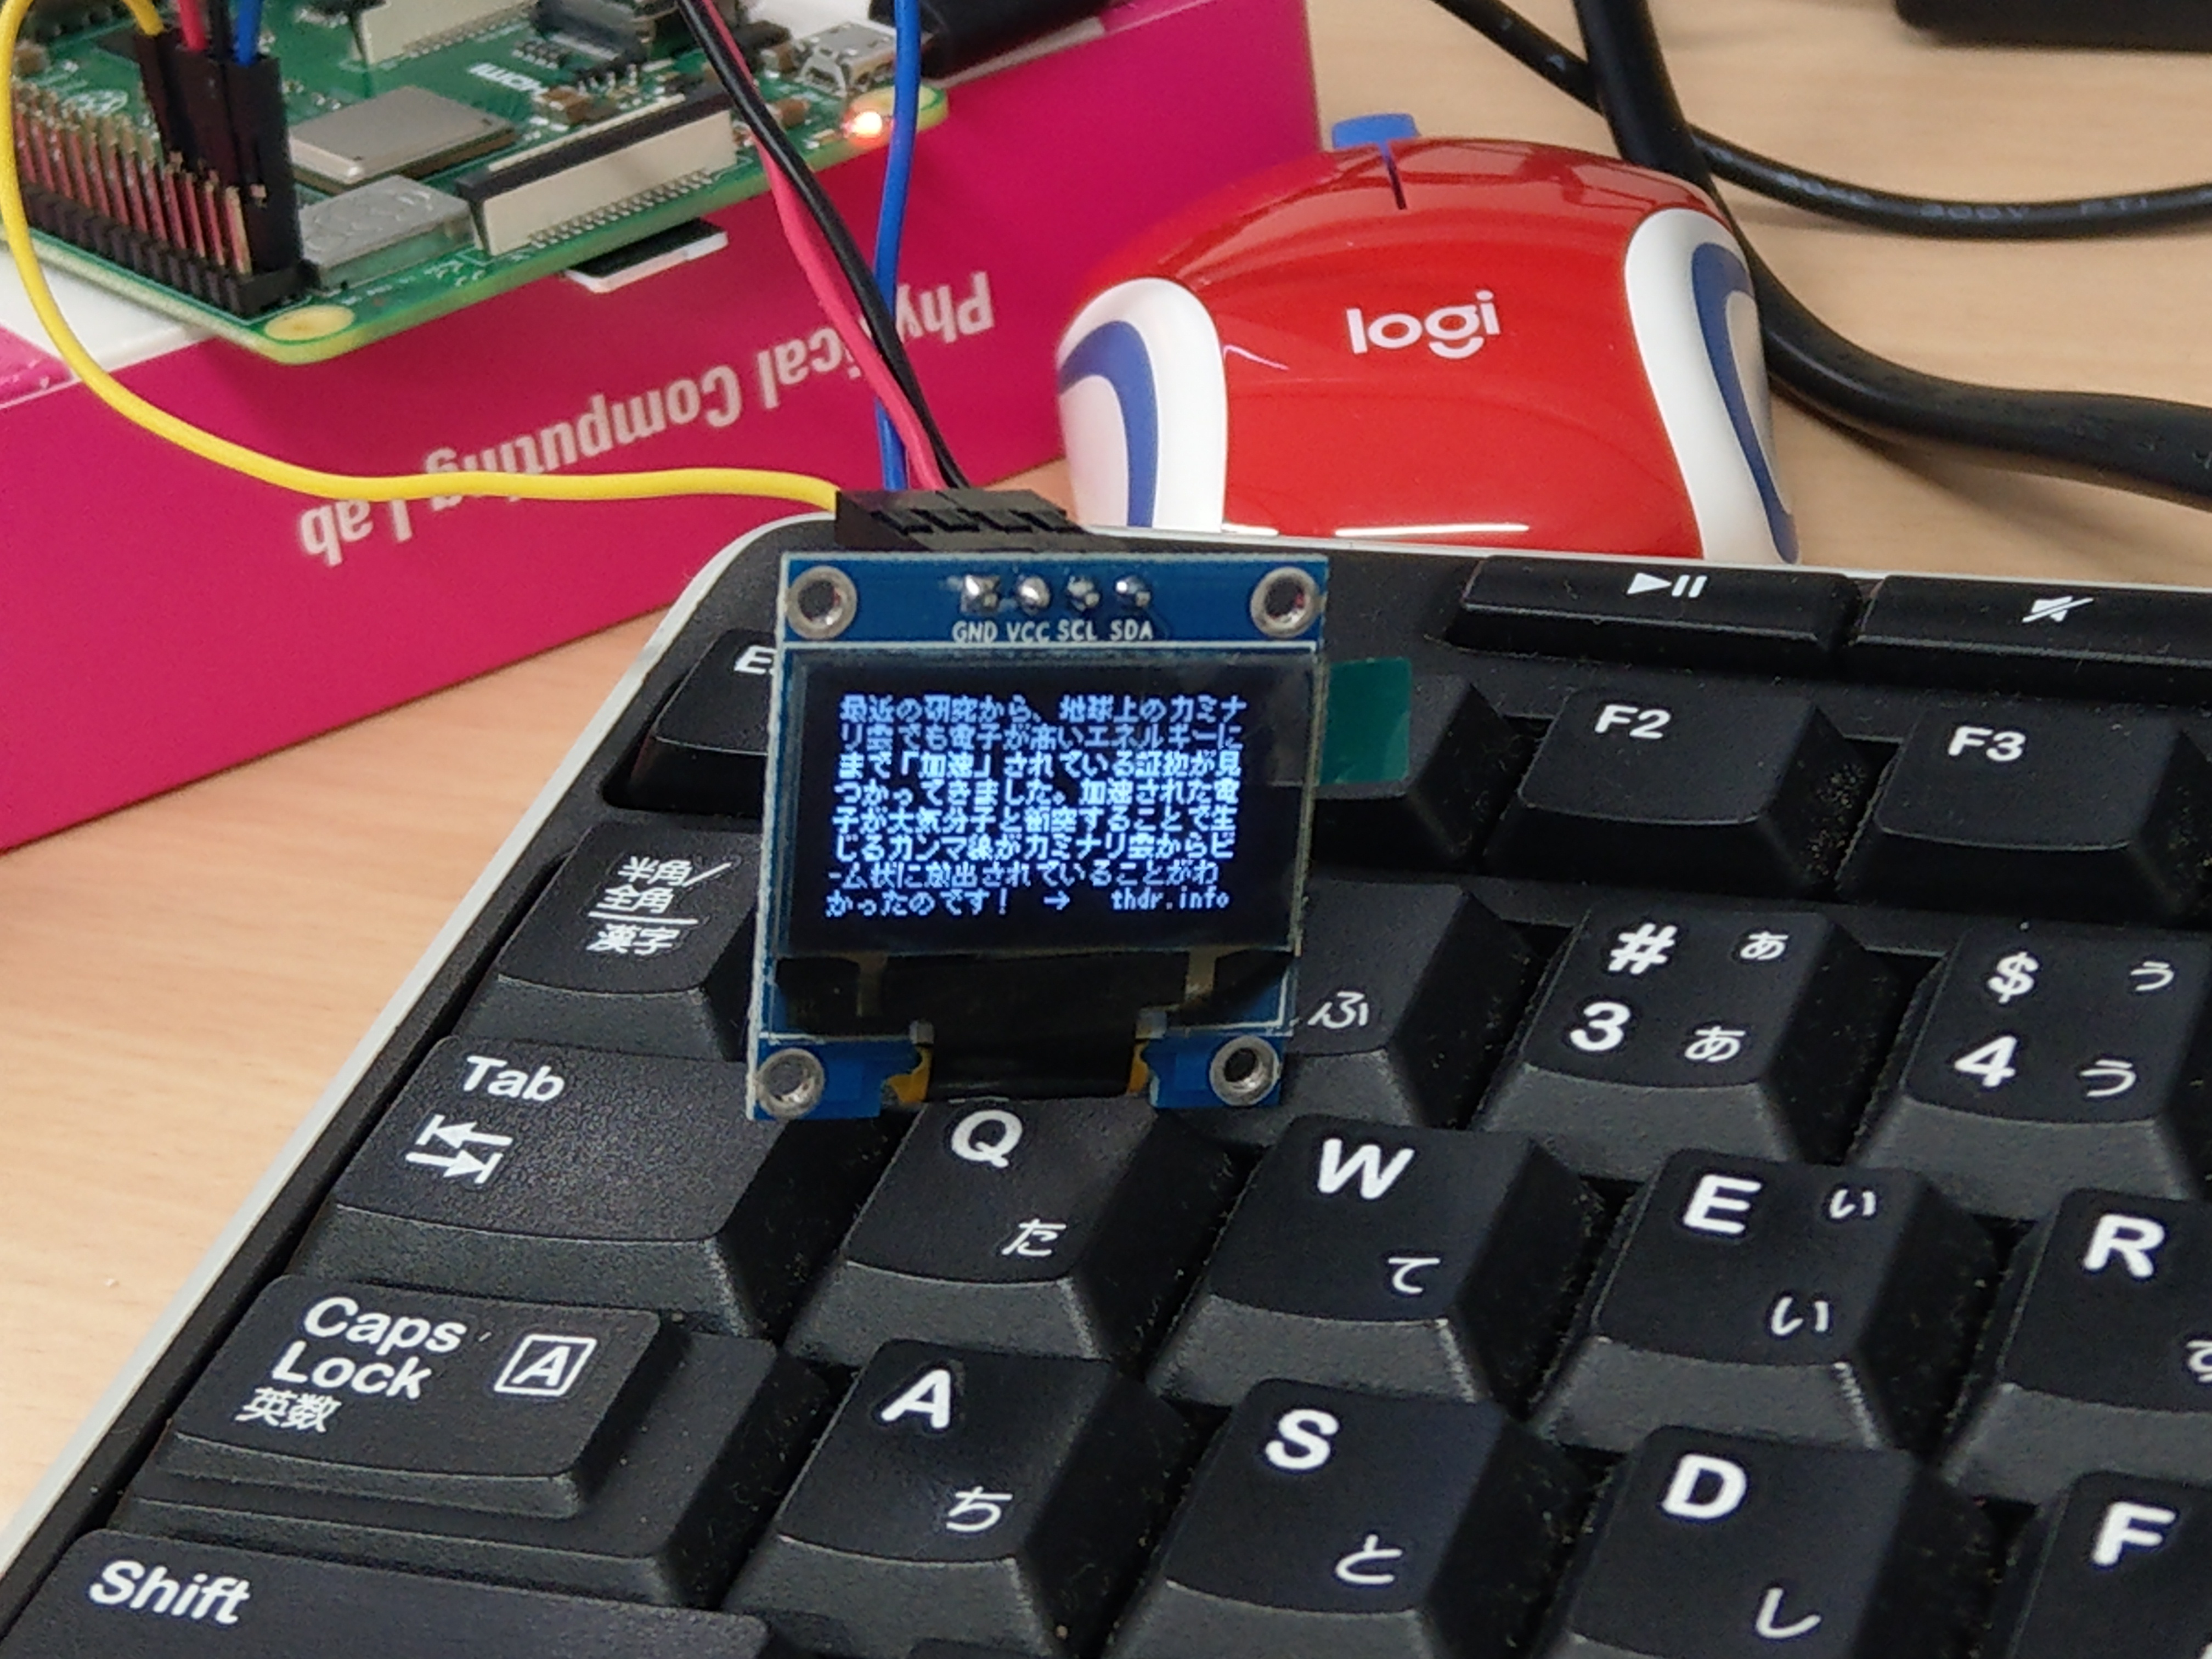
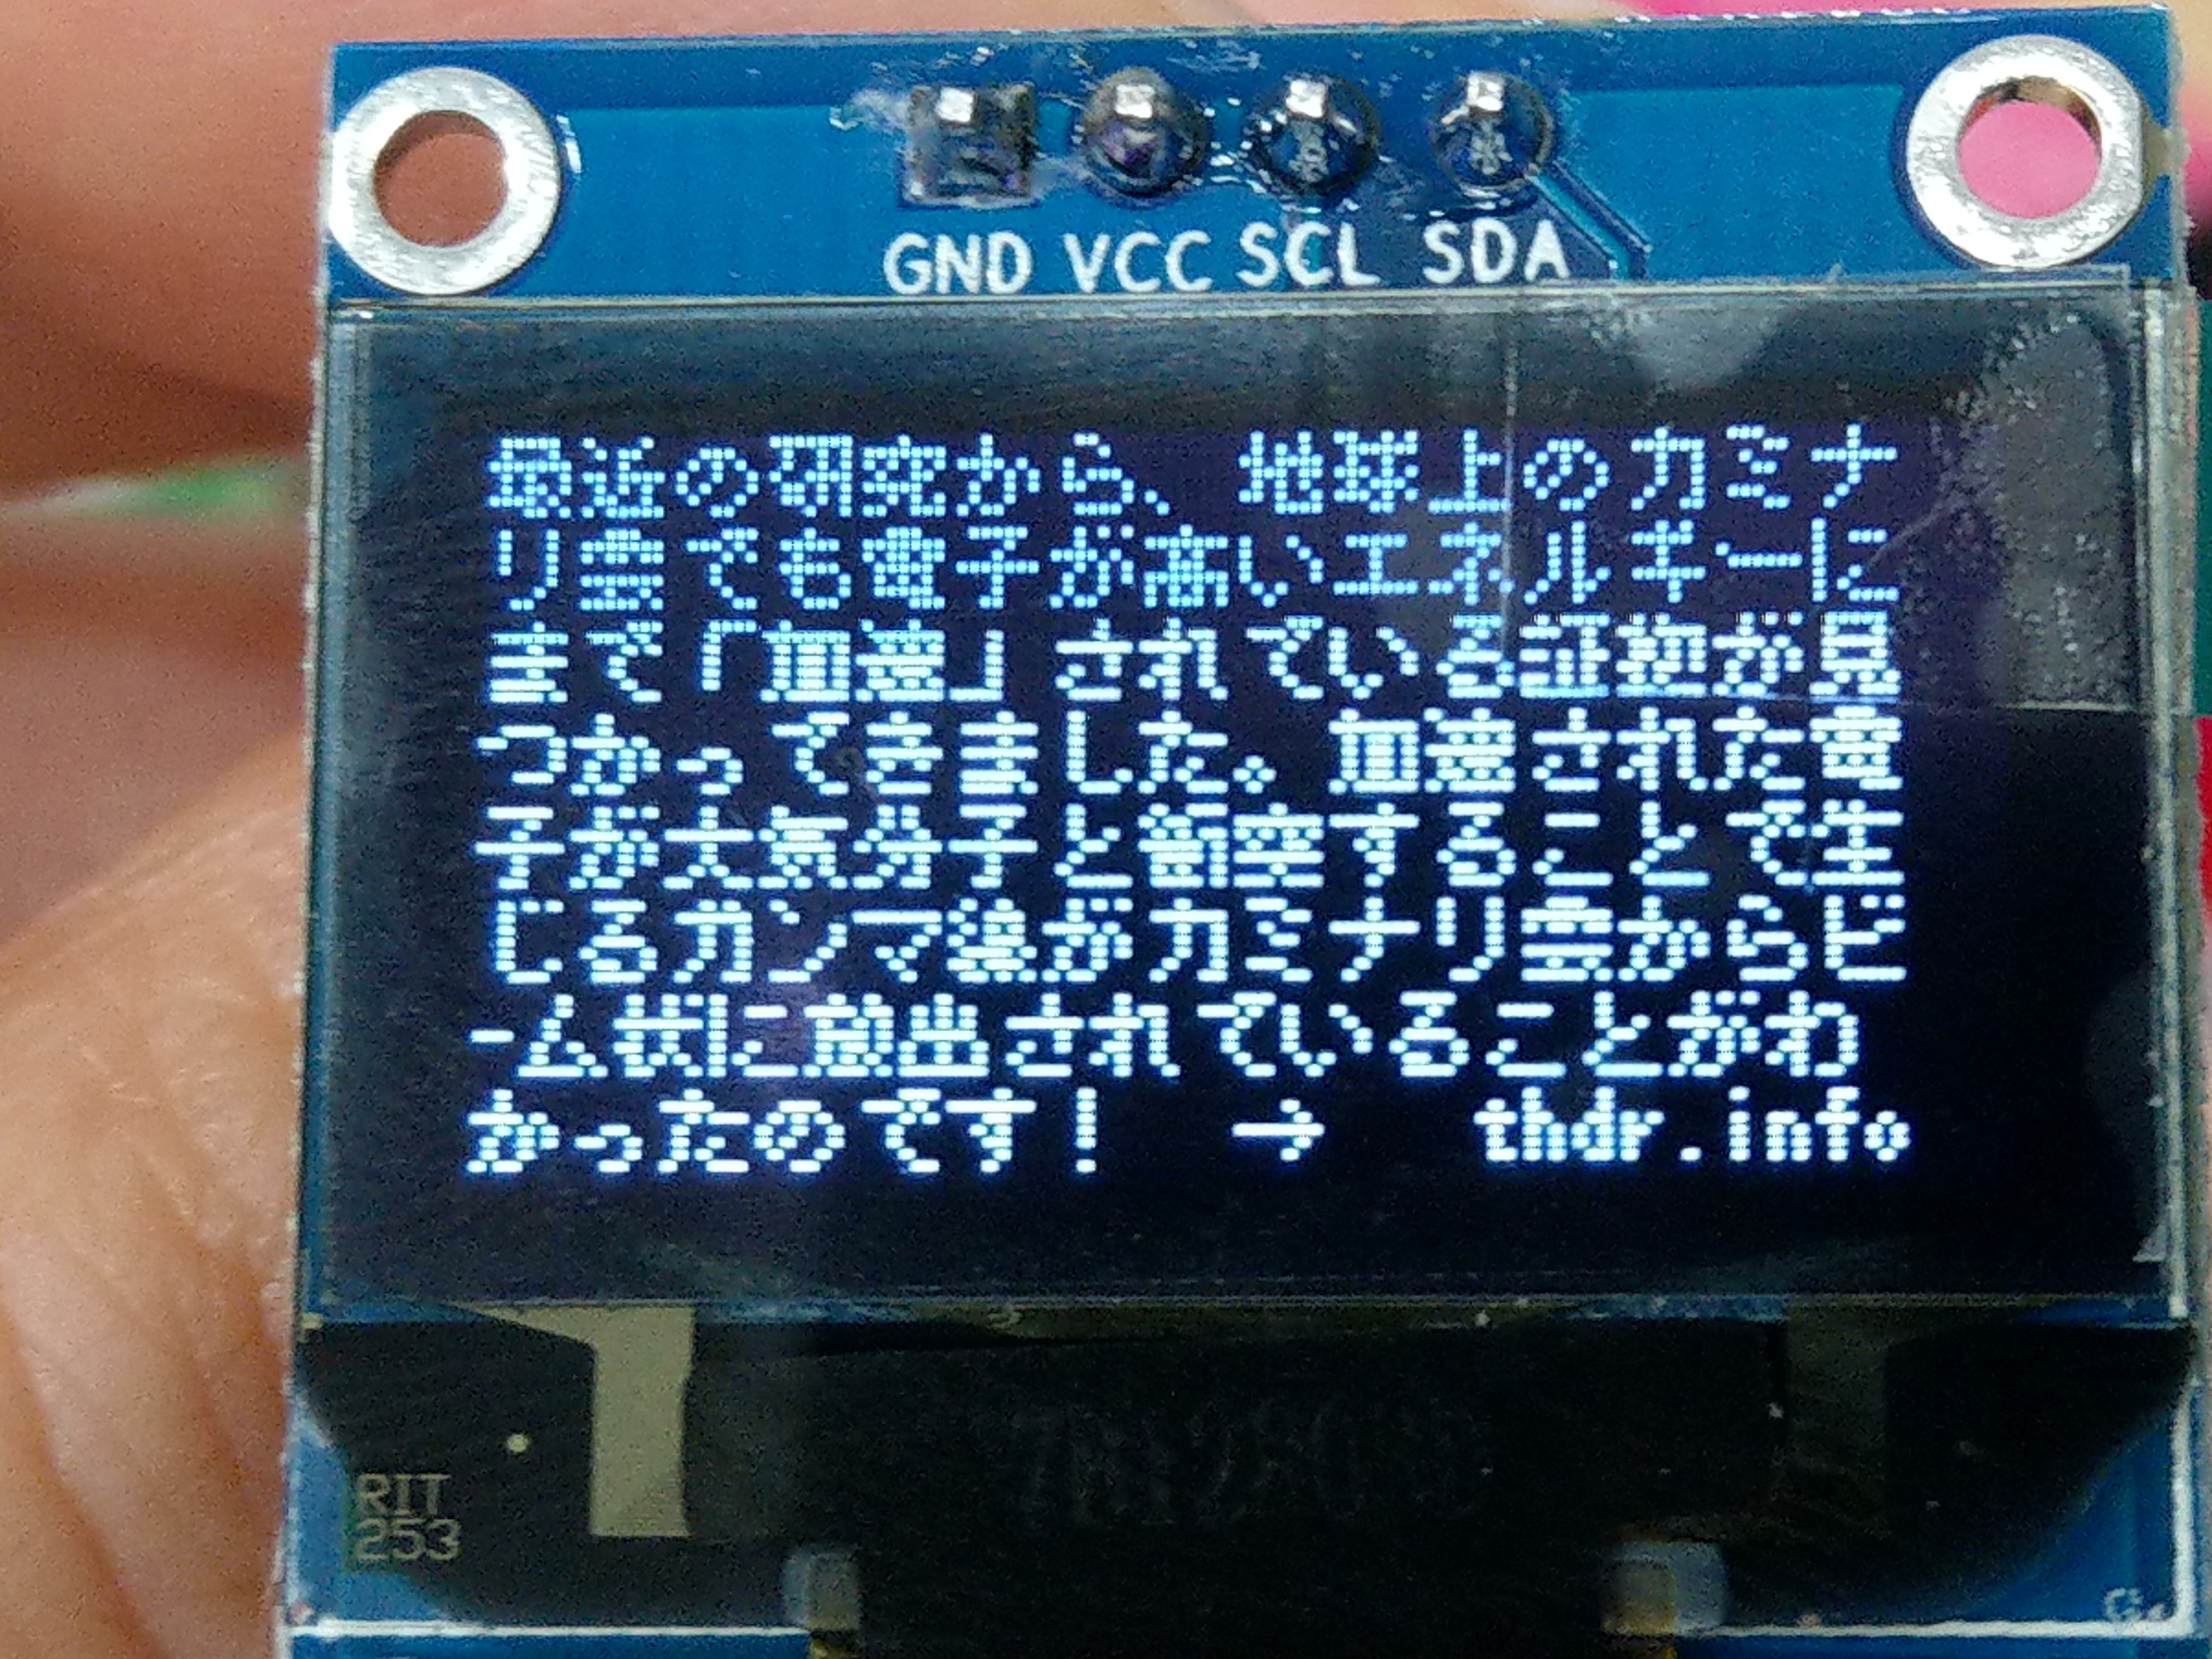
なんとか日本語も表示できました。今回はここまでにしたいと思います。
もっとライブラリを自在に操って色々表示できたらと思います。