
Flutterのビルド出力文字化け

津路です。お久しぶりです。
しばらく、Google社が提供されている、モバイル・PCアプリ開発環境を探っています。
Windows上で、Android StudioにFlutter/Dart Pluginをインストール。
デフォルトオプションでFlutterプロジェクトを作成し、Runすると、画面中心に、タップした回数が表示されます。
アプリ画面中央のText Widgetの下に、入力項目TextFieldを追加。
  Widget build(BuildContext context) {
    // This method is rerun every time setState is called, for instance as done
    // by the _incrementCounter method above.
    //
    // The Flutter framework has been optimized to make rerunning build methods
    // fast, so that you can just rebuild anything that needs updating rather
    // than having to individually change instances of widgets.
    return Scaffold(
      appBar: AppBar(
        // Here we take the value from the MyHomePage object that was created by
        // the App.build method, and use it to set our appbar title.
        title: Text(widget.title),
      ),
      body: Center(
        // Center is a layout widget. It takes a single child and positions it
        // in the middle of the parent.
        child: Column(
          // Column is also a layout widget. It takes a list of children and
          // arranges them vertically. By default, it sizes itself to fit its
          // children horizontally, and tries to be as tall as its parent.
          //
          // Invoke "debug painting" (press "p" in the console, choose the
          // "Toggle Debug Paint" action from the Flutter Inspector in Android
          // Studio, or the "Toggle Debug Paint" command in Visual Studio Code)
          // to see the wireframe for each widget.
          //
          // Column has various properties to control how it sizes itself and
          // how it positions its children. Here we use mainAxisAlignment to
          // center the children vertically; the main axis here is the vertical
          // axis because Columns are vertical (the cross axis would be
          // horizontal).
          mainAxisAlignment: MainAxisAlignment.center,
          children: <Widget>[
            const Text(
              'You have pushed the button this many times:',
            ),
            Text(
              '$_counter',
              style: Theme.of(context).textTheme.headline4,
            ),
            //入力フィールド追加
            new TextField(enabled: true,
              // 入力数
              maxLength: 10,
              style: TextStyle(color: Colors.red),
              obscureText: false,
              maxLines:1 ,)
          ],
        ),
      ),
      floatingActionButton: FloatingActionButton(
        onPressed: _incrementCounter,
        tooltip: 'Increment',
        child: const Icon(Icons.add),
      ), // This trailing comma makes auto-formatting nicer for build methods.
    );
  }
このアプリをWindowsタスク常駐アプリとするため、bitsdojo_window、system_trayパッケージを追加
pubspec.yamlのdependencies項目に以下を追加
#  system_tray: ^0.1.0
#  bitsdojo_window: ^0.1.1+1
次に、ウィンドウを非表示とするため、以下をwindows/runner/main.cppに追加
//#include <bitsdojo_window_windows/bitsdojo_window_plugin.h>
//auto bdw = bitsdojo_window_configure(BDW_HIDE_ON_STARTUP);
main.dart内のmain関数に、以下を追加
  //tsuji Windowsウインドウが表示される際のサイズなどを設定します
 doWhenWindowReady(() {
   final initialSize = Size(600, 450);
   appWindow.minSize = initialSize;
   appWindow.size = initialSize;
   appWindow.alignment = Alignment.center;
 });
更に、system_trayを利用します。
import 'package:system_tray/system_tray.dart';
build関数に追加
/*  void initState() {
    super.initState();
    initSystemTray();
  }

  Future<void> initSystemTray() async {
    String path = 'assets/idea.ico';

    await _systemTray.initSystemTray(
      title: "system tray",
      iconPath: path,
      toolTip: "How to use system tray with Flutter",
    );

    _systemTray.registerSystemTrayEventHandler((eventName) {
      if (eventName == "leftMouseDown") {
      } else if (eventName == "leftMouseUp") {
        _appWindow.show();
      }
    });
  }*/
以上を追加して、Runしたところ、コマンドで実行しなさいということです。
さて、Android Studio下でTerminalを表示し、PSと出ているのを確認して、flutter runを実行すると、エラーとなりました。
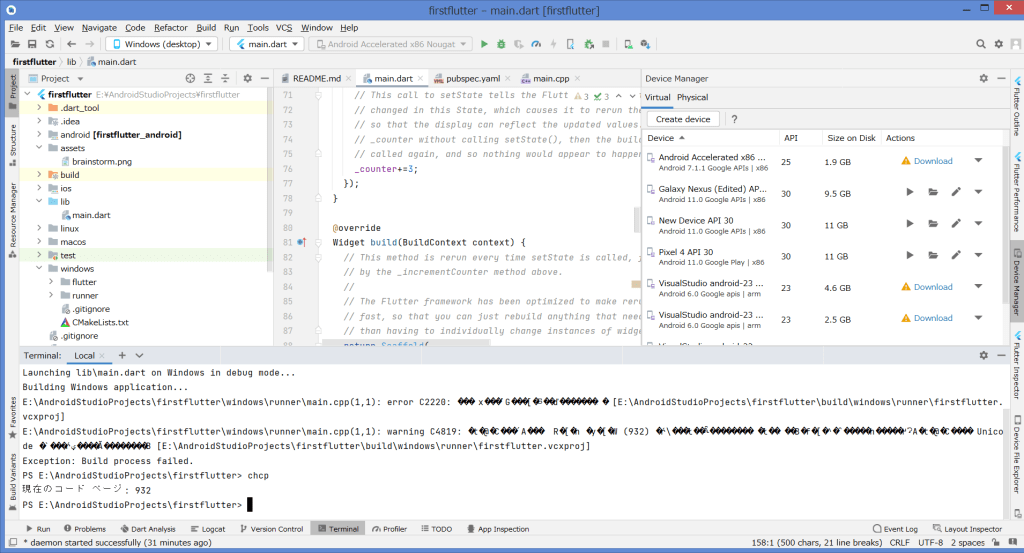
となるので、chcp 65001でUTF-8にしましたが、変化なし。
ここで、一旦止まりました。